


Table of Contents
How to Develop Spring Boot REST API CRUD Example With MySQL Database:
Step 1: Create a Spring Boot Project
Let’s start with the Spring Boot REST API CRUD Example With MySQL Database ::
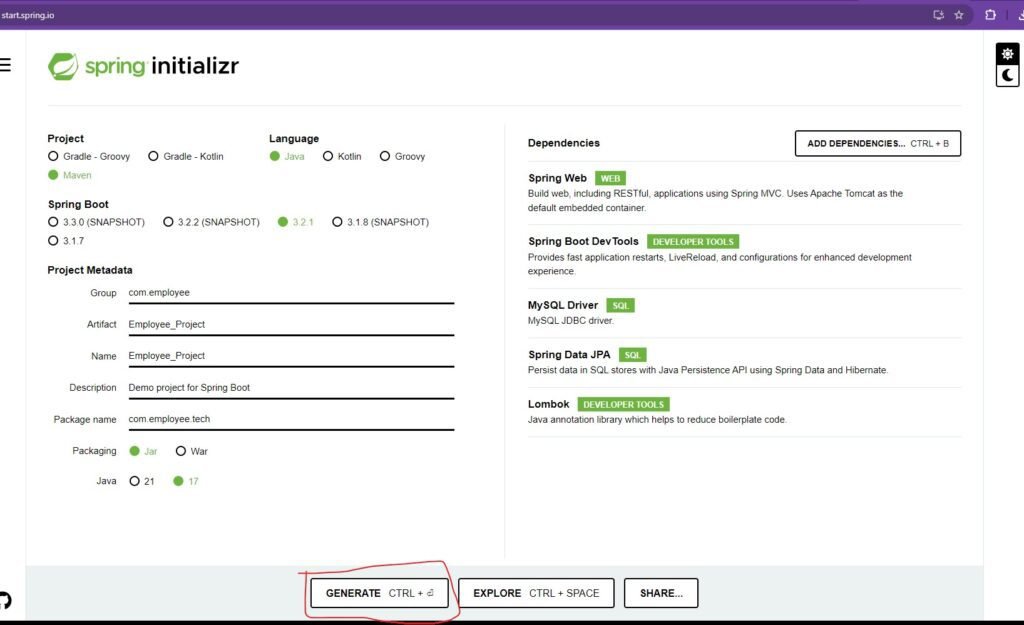
1.1. Go to Spring Initializer in your web browser.
1.2. Configure your Spring Boot project by selecting the necessary options like Project, Language, Spring Boot version, and packaging.
1.3. Add any required dependencies for your project. For a CRUD application, you’ll typically need dependencies like Spring Web, Spring Data JPA, and your preferred database driver (e.g., H2, MySQL, or PostgreSQL).
1.4. To acquire the project as a ZIP file, press the “Generate” button

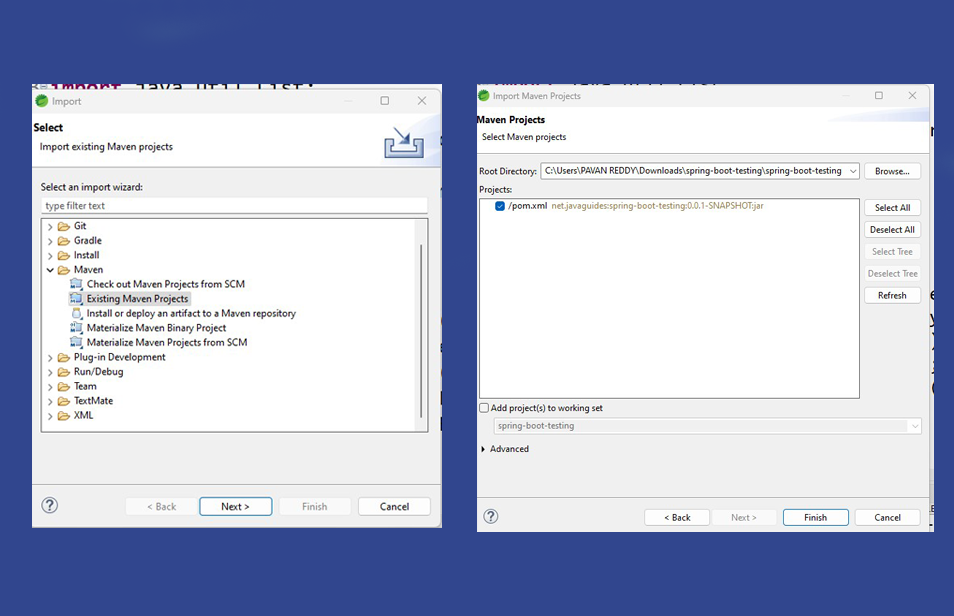
1.5 After extraction the file, open to open preferred integrated development environment (IDE) like Spring Tool Suite (STS) or IntelliJ IDEA and Import Into your IDE.

Step 2: Pom.xml Dependencies
2.1. go to your pom.xml file of your project.
2.2. Make sure it includes the following dependencies:
      // Spring Boot REST API CRUD Example With MySQL Database

        <properties>
		<java.version>17</java.version>
	</properties>
	<dependencies>
		<dependency>
			<groupId>org.springframework.boot</groupId>
			<artifactId>spring-boot-starter-data-jpa</artifactId>
		</dependency>
		<dependency>
			<groupId>org.springframework.boot</groupId>
			<artifactId>spring-boot-starter-web</artifactId>
		</dependency>

		<dependency>
			<groupId>org.springframework.boot</groupId>
			<artifactId>spring-boot-devtools</artifactId>
			<scope>runtime</scope>
			<optional>true</optional>
		</dependency>
		<dependency>
			<groupId>com.mysql</groupId>
			<artifactId>mysql-connector-j</artifactId>
			<scope>runtime</scope>
		</dependency>
		<dependency>
			<groupId>org.springframework.boot</groupId>
			<artifactId>spring-boot-starter-test</artifactId>
			<scope>test</scope>
		</dependency>
	</dependencies>
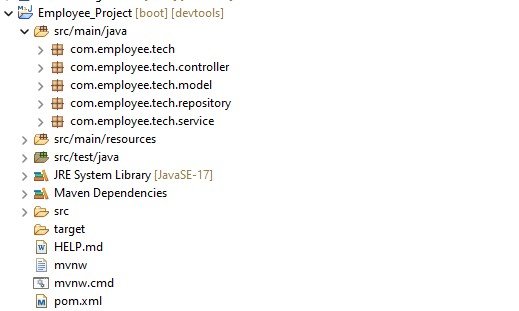
Step 3: Create Packages
3.1. Create the following packages: entity, repository, service, and controller.

Step 4: Configure Database Properties
4.1.Open the application.properties file by moving to the src/main/resources directory.
4.2. Configure your database connection properties.
#Spring Boot REST API CRUD Example With MySQL Database
# MySQL database properties
spring.datasource.url=jdbc:mysql://localhost:3306/employee_table
spring.datasource.username=root
spring.datasource.password=root

# Hibernate properties
spring.jpa.hibernate.ddl-auto=update
spring.jpa.show-sql=true
spring.jpa.properties.hibernate.format_sql=true
spring.jpa.properties.hibernate.dialect=org.hibernate.dialect.MySQL8Dialect
Step 5: Create Employee Entity
5.1. In the entity package, create a class named Employee.
// Spring Boot REST API CRUD Example With MySQL Database
import java.util.Date;
import jakarta.persistence.*;

@Entity
@Table(name="employee_table")
public class Employee {

	@Id
	@GeneratedValue(strategy = GenerationType.IDENTITY)
	private Long id;
	private String firstName;
	private String lastName;
	private String position;
	private double salary;
	private String createdBy;
	private String createdSource;
	private Date createdTime;
	private String updatedBy;
	private String updatedSource;
	private Date updatedTime;

	public Long getId() {
		return id;
	}

	public void setId(Long id) {
		this.id = id;
	}

	public String getFirstName() {
		return firstName;
	}

	public void setFirstName(String firstName) {
		this.firstName = firstName;
	}

	public String getLastName() {
		return lastName;
	}

	public void setLastName(String lastName) {
		this.lastName = lastName;
	}

	public String getPosition() {
		return position;
	}

	public void setPosition(String position) {
		this.position = position;
	}

	public double getSalary() {
		return salary;
	}

	public void setSalary(double salary) {
		this.salary = salary;
	}

	public String getCreatedBy() {
		return createdBy;
	}

	public void setCreatedBy(String createdBy) {
		this.createdBy = createdBy;
	}

	public String getCreatedSource() {
		return createdSource;
	}

	public void setCreatedSource(String createdSource) {
		this.createdSource = createdSource;
	}

	public Date getCreatedTime() {
		return createdTime;
	}

	public void setCreatedTime(Date createdTime) {
		this.createdTime = createdTime;
	}

	public String getUpdatedBy() {
		return updatedBy;
	}

	public void setUpdatedBy(String updatedBy) {
		this.updatedBy = updatedBy;
	}

	public String getUpdatedSource() {
		return updatedSource;
	}

	public void setUpdatedSource(String updatedSource) {
		this.updatedSource = updatedSource;
	}

	public Date getUpdatedTime() {
		return updatedTime;
	}

	public void setUpdatedTime(Date updatedTime) {
		this.updatedTime = updatedTime;
	}
}
Step 6: Create Employee Repository
6.1. In the repository package, create an interface named EmployeeRepository.
//Spring Boot REST API CRUD Example With MySQL Database
import org.springframework.data.jpa.repository.JpaRepository;
import org.springframework.stereotype.Repository;
import com.employee.tech.model.Employee;

@Repository
public interface EmployeeRepository extends JpaRepository<Employee, Long> {

}
Step 7: Create CRUD Operations in Employee Service
7.1. In the service package, create an interface named EmployeeService.
//Spring Boot REST API CRUD Example With MySQL Database
import java.util.List;
import org.springframework.stereotype.Service;
import com.employee.tech.model.Employee;

@Service
public interface EmployeeService {

	public Employee saveEmployee(Employee employee);
	public Employee updateEmployee(Employee employee);
	public String deleteEmployee(Long id);
	public Employee getEmployee(Long id);
	public List<Employee> getAllEmployee();

}
6.2. In the same service package, create a class named EmployeeServiceImpl and Implements EmployeeService Interface.
// Spring Boot REST API CRUD Example With MySQL Database

import java.util.Date;
import java.util.List;
import java.util.Optional;
import org.springframework.beans.factory.annotation.Autowired;
import org.springframework.stereotype.Service;

import com.employee.tech.model.Employee;
import com.employee.tech.repository.EmployeeRepository;
import jakarta.persistence.EntityNotFoundException;

@Service
public class EmployeeServiceImpl implements EmployeeService {

	@Autowired
	private EmployeeRepository employeeRepository;

	@Override
	public Employee saveEmployee(Employee employee) {
		employee.setCreatedBy("HR");
		employee.setCreatedSource("saveEmployee()");
		employee.setCreatedTime(new Date());
		return employeeRepository.save(employee);
	}

	@Override
	public Employee updateEmployee(Employee employee) {
		Optional<Employee> optionalExistingEmployee = employeeRepository.findById(employee.getId());
		if (optionalExistingEmployee != null) {
			Employee existingEmployee = optionalExistingEmployee.get();
			existingEmployee.setFirstName(employee.getFirstName());
			existingEmployee.setLastName(employee.getLastName());
			existingEmployee.setPosition(employee.getPosition());
			existingEmployee.setSalary(employee.getSalary());
			existingEmployee.setUpdatedBy("HR");
			existingEmployee.setUpdatedSource("updateEmployee()");
			existingEmployee.setUpdatedTime(new Date());
			return employeeRepository.save(existingEmployee);
		} else {
			throw new EntityNotFoundException("Employee with ID " + employee.getId() + " not found");
		}
	}

	@Override
	public String deleteEmployee(Long id) {
		Optional<Employee> optionalExistingEmployee = employeeRepository.findById(id);
		if (optionalExistingEmployee != null) {
			employeeRepository.deleteById(id);
			return "Employee with ID " + id + " deleted successfully.";
		} else {
			return "Employee with ID " + id + " not found.";
		}
	}

	@Override
	public Employee getEmployee(Long id) {
		Optional<Employee> optionalEmployee = employeeRepository.findById(id);
		if (optionalEmployee.isPresent()) {
			return optionalEmployee.get();
		} else {
			throw new EntityNotFoundException("Employee with ID " + id + " not found");
		}
	}

	@Override
	public List<Employee> getAllEmployee() {
		return employeeRepository.findAll();
	}

}
Step 8: Create EmployeeController
8.1. In the controller package, create a class named EmployeeController.
import java.util.List;
import org.springframework.beans.factory.annotation.Autowired;
import org.springframework.http.HttpStatus;
import org.springframework.http.ResponseEntity;
import org.springframework.web.bind.annotation.DeleteMapping;
import org.springframework.web.bind.annotation.GetMapping;
import org.springframework.web.bind.annotation.PathVariable;
import org.springframework.web.bind.annotation.PostMapping;
import org.springframework.web.bind.annotation.PutMapping;
import org.springframework.web.bind.annotation.RequestBody;
import org.springframework.web.bind.annotation.RequestMapping;
import org.springframework.web.bind.annotation.RestController;
import com.employee.tech.model.Employee;
import com.employee.tech.service.EmployeeService;

@RestController
@RequestMapping("/api")
public class EmployeeController {

	@Autowired
	private EmployeeService employeeService;

	@PostMapping("/createEmployees")
	public ResponseEntity<Employee> createEmployee(@RequestBody Employee emp) {
		Employee savedEmployee = employeeService.saveEmployee(emp);
		return new ResponseEntity<>(savedEmployee, HttpStatus.CREATED);
	}

	@PutMapping("/{id}")
	public ResponseEntity<Employee> updateEmployee(@PathVariable Long id, @RequestBody Employee emp) {
	emp.setId(id); // Ensure the ID in the path and the ID in the request body match
		Employee updatedEmployee = employeeService.updateEmployee(emp);
		return new ResponseEntity<>(updatedEmployee, HttpStatus.OK);
	}

	@DeleteMapping("/{id}")
	public ResponseEntity<String> deleteEmployee(@PathVariable Long id) {
		String result = employeeService.deleteEmployee(id);
		return new ResponseEntity<>(result, HttpStatus.OK);
	}

	@GetMapping("/{id}")
	public ResponseEntity<Employee> getEmployee(@PathVariable Long id) {
		Employee employee = employeeService.getEmployee(id);
		return new ResponseEntity<>(employee, HttpStatus.OK);
	}

	@GetMapping("/getAllEmployees")
	public ResponseEntity<List<Employee>> getAllEmployees() {
		List<Employee> employees = employeeService.getAllEmployee();
		return new ResponseEntity<>(employees, HttpStatus.OK);
	}

}
Step 9: Test APIs with Postman
9.1. Run your Spring Boot application.
9.2. Open Postman and test the CRUD operations by sending HTTP requests to the respective endpoints defined in the Employee Controller.
For example:
- GET /api/employees to retrieve all employees.
http://localhost:8080/api/getAllEmployees - To find a specific employee by ID, execute the GET
http://localhost:8080/api/1 - POST /api/employees to create a new employee. http://localhost:8080/api/createEmployees
// json formate for creating the employee.
//PUT mapping by sending a JSON payload with the updated values, and the updatedBy,
// updatedSource, and updatedTime fields populated accordingly.

{
  "firstName": "Bharath",
  "lastName": "Chari",
  "position": "Manager",
  "salary": 60000.00
}- PUT /api/employees/{id} to update an existing employee.
http://localhost:8080/api/id
{
  "firstName": "Updated First Name",
  "lastName": "Updated Last Name",
  "position": "Updated Position",
  "salary": 65000.00,

}- DELETE /api/employees/{id} to delete an employee by ID.
http://localhost:8080/api/id
You now have a basic Spring Boot CRUD application set up and ready for use. You can expand upon this foundation by adding validation, security, and more advanced features as needed.
Download the Employee MiniProject code from Link: Github
Registration And Login Forms Links:
-> Creating Responsive Login and Registration Form in Html CSS and JavaScript with Validations
-> Create a Stunning Tailwind CSS Registration Form with HTML and JavaScript Validation | Step-by-Step Tutorial


